Menus and controls
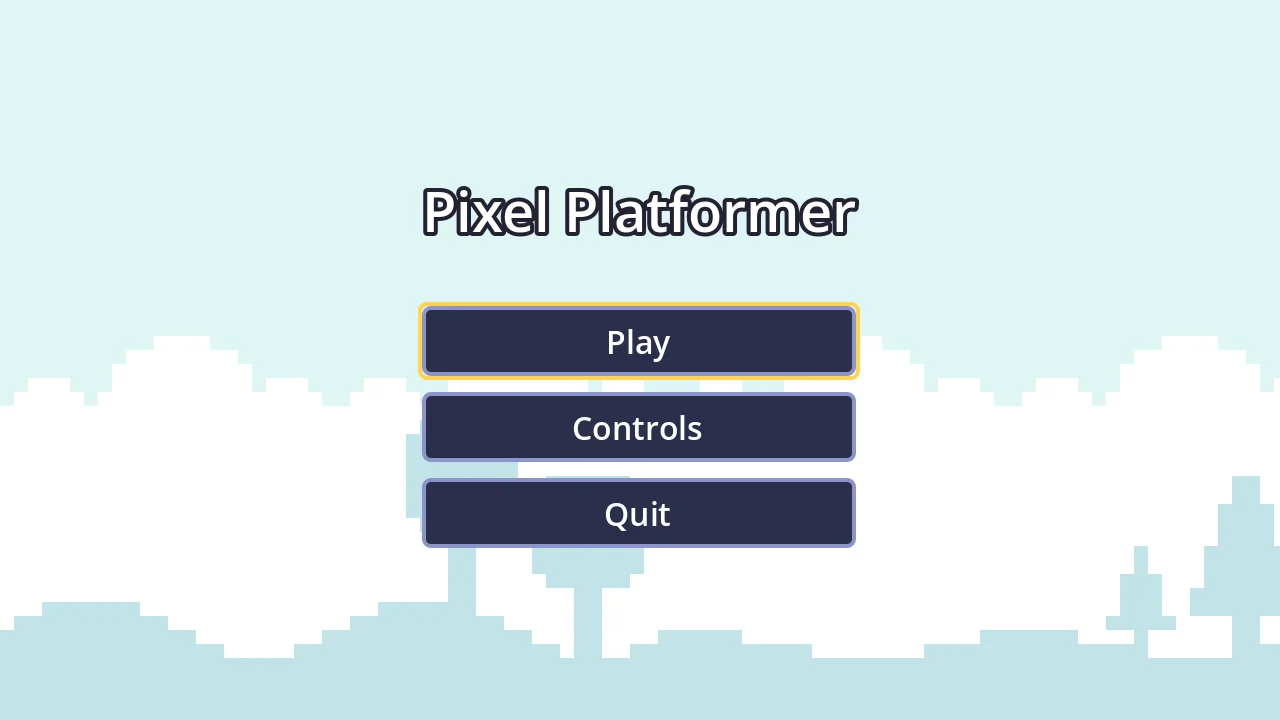
In this tutorial you add menus to the 2D platformer: the game opens on a main menu, Esc pauses it, and a Controls screen lets the player change the keys. The keys they choose are saved, and the game starts with them the next time.
Along the way you’ll see:
- A menu is a UI (
.uip) with its own code, andUiManager.show()puts it on screen. - A scene can have its own Game Mode: the main menu’s has no player, HUD or rules.
- Enhanced Input lets the player change the keys marked Player Mappable, and it saves them and loads them by itself.
- Pausing stops the game, except what has its process mode set to Always.
1. Start from the platformer
Section titled “1. Start from the platformer”Open the platformer’s project. Everything that follows adds to it: three UIs (MainMenu.uip,
Controls.uip, Pause.uip), a scene for the main menu, and a few lines in the HUD and the
rules.
2. Keys the player can change
Section titled “2. Keys the player can change”Not every key has to change. Here the player can change three: A (move left), D (move right) and Space (jump). The arrows and W stay as they are, as a second way to play.
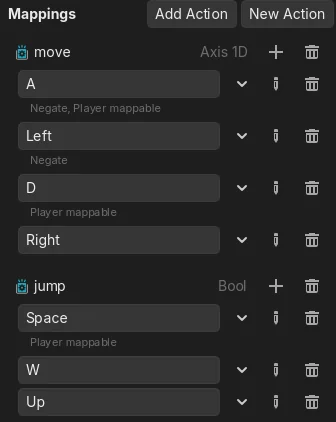
Select input/controls.inputcontext. The Inspector shows each action with its keys. For each of
the three keys, press its Edit button (the pencil, between the arrow and the bin), turn on
Player Mappable and give it a name, then go back:
| Key | Mapping Name | Display Name |
|---|---|---|
| A (move, with Negate) | move_left | Move left |
| D (move) | move_right | Move right |
| Space (jump) | jump | Jump |
- The Mapping Name is how the code calls the key (
"move_left"). Don’t change it once the game is out: the keys players saved go by that name. - The Display Name is for menus that list the keys by themselves.
3. How the menus look
Section titled “3. How the menus look”The three UIs share one look, written in the project’s style sheet, style/base.gss. Open it
and write:
/* The project's style sheet: the base of every UI. */
:root {  --panel: #1b1e30;  --button: #2b2f4a;  --edge: #8b93c9;  --focus: #ffd34d;}
/* The menus' windows. */PanelContainer {  background: var(--panel);  border: 2px solid var(--edge);  border-radius: 6px;  padding: 14px;}
/* The buttons: dark with a light edge; the one with the focus (the   keyboard's), with a yellow edge. */Button {  background: var(--button);  border: 2px solid var(--edge);  border-radius: 4px;  padding: 4px 14px;  color: #ffffff;  font-size: 16px;}Button:hover { background: #3b4170; }Button:pressed { background: #1d2033; }Button:focus { border: 2px solid var(--focus); }
/* Titles, with the Class "Title". */Label.Title {  font-size: 28px;  color: #ffffff;  font-outline-color: #222233;  outline-size: 8;  text-align: center;}
/* Small grey text, with the Class "Hint". */Label.Hint { font-size: 12px; color: #b8bdd8; text-align: center;}Button:focusis the button the keyboard is on: it gets a yellow edge. Without it, a player with the keyboard wouldn’t know where they are.- A title is a Label whose Class (Inspector > Theme) is
Title; a small text,Hint.
4. The main menu
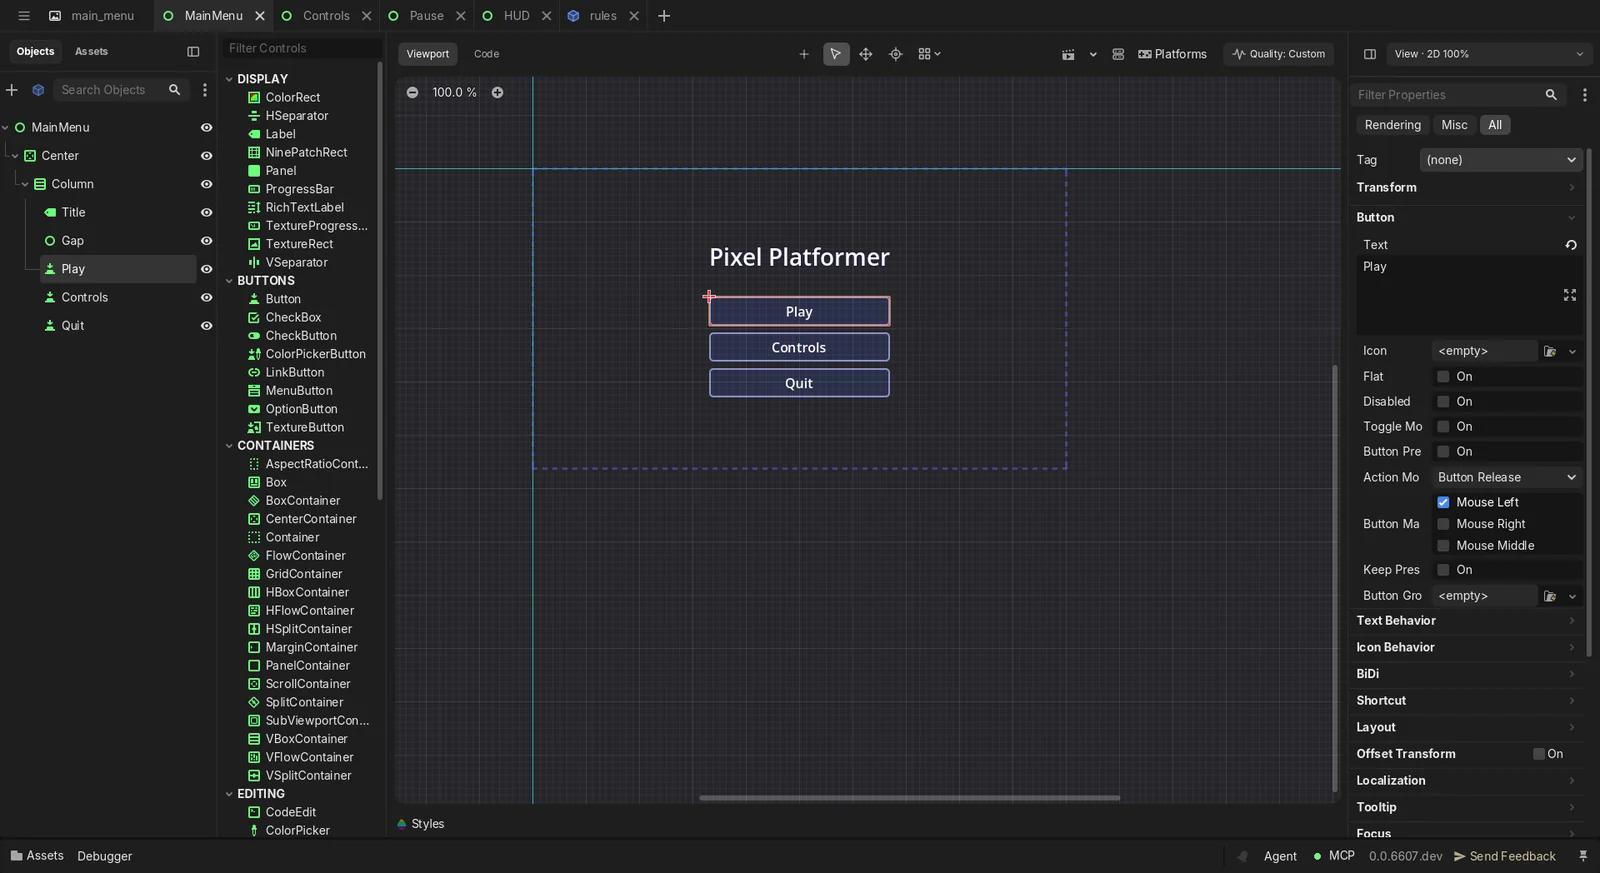
Section titled “4. The main menu”Create ui/MainMenu.uip (a UI), with a Control as the root, full
screen:
Center(CenterContainer), full screen: it centres what it holds.Column(VBoxContainer), with Separation 8: one under the other.Title(Label), ClassTitle, the textPixel Platformer.Gap(Control), Custom Minimum Size 0 × 12: a bit of space.Play,ControlsandQuit(Button).
Its code:
module MainMenu
# The menu's buttons, and the Controls screen it opens.use actor::Play as play_button : Buttonuse actor::Controls as controls_button : Buttonuse actor::Quit as quit_button : Buttonuse ui::Controls as controls_ui
# Runs once, when the menu appears.fn _ready() void {  # The keyboard starts on Play: the arrows move between the buttons  # and Enter or Space presses one.  play_button.grab_focus()}
on play_button.pressed() {  SceneManager.load("level1")}
on controls_button.pressed() {  # Layer 10: drawn over the menu, which is on layer 1.  _ = UiManager.show(controls_ui, 10)}
on quit_button.pressed() { get_tree().quit()}grab_focus()puts the keyboard on Play. From there, the arrows go to the other buttons and Enter or Space presses one. That comes with the engine: the menus need no code to move.UiManager.show(controls_ui, 10)puts the Controls screen on a higher layer, over the menu.
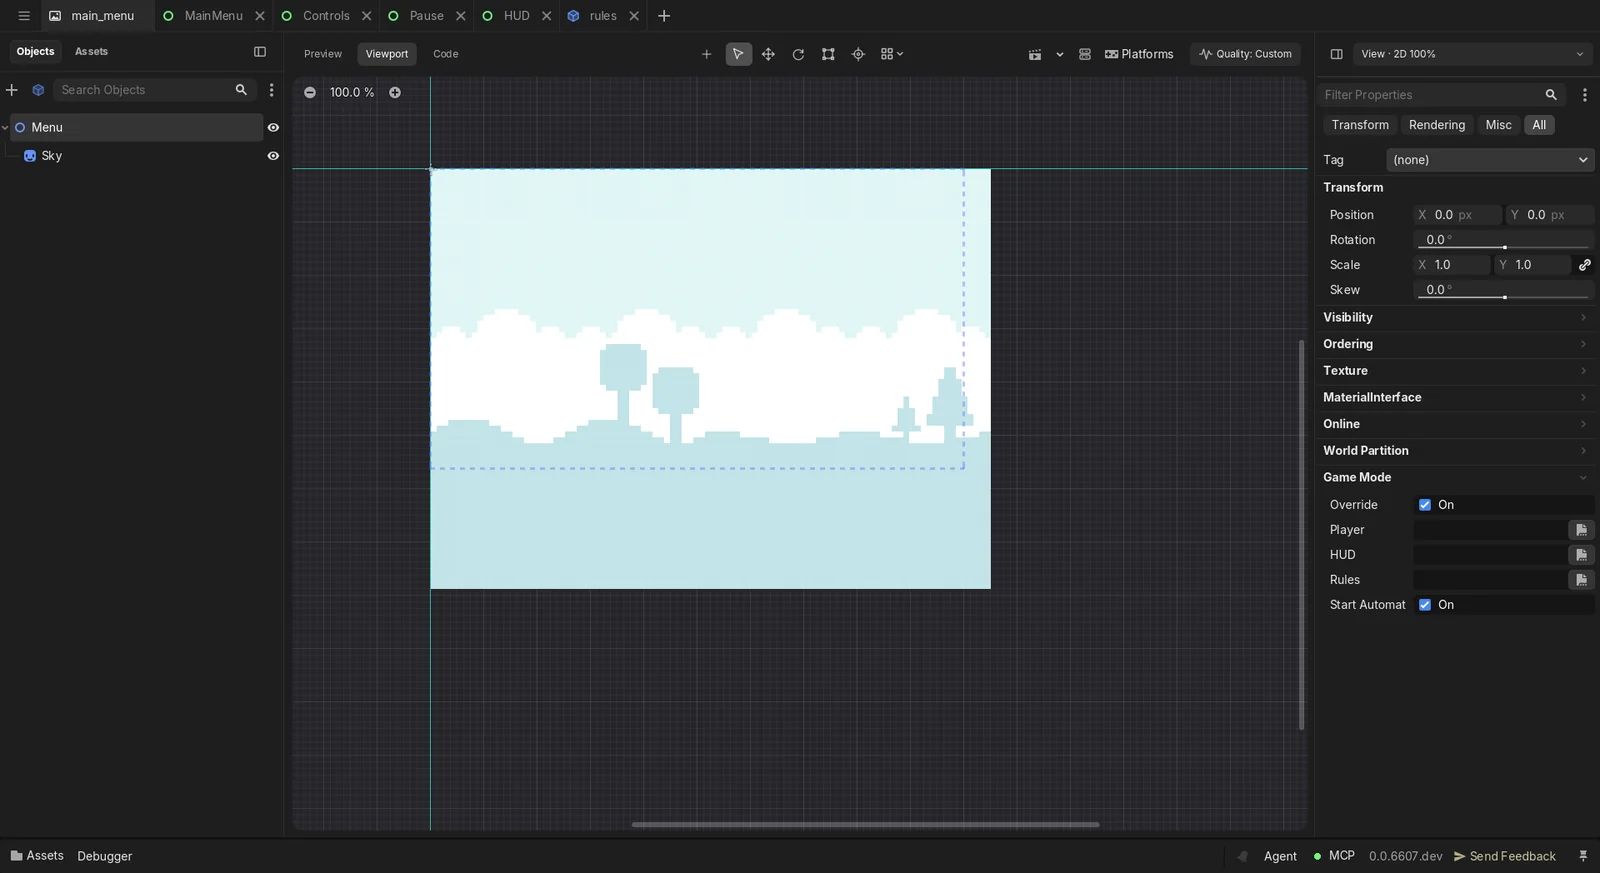
The menu needs a scene to live in. Create scenes/main_menu.scene with a Spatial as the
root, called Menu, and a Sprite with assets/art/sky.png (Scale 7 × 7, Centered off), the
same sky as the level.
The level gets its player, HUD and rules from the Game Mode. The menu mustn’t: select the root and, in the Inspector, turn on Game Mode > Override and leave Player, HUD and Rules empty.
Its code only shows the menu:
module Menu
# The main menu's scene: the sky, and the menu on top. Its Game Mode is# overridden with no player, HUD or rules (select the root, then Game# Mode > Override in the inspector), so nothing else appears here.use ui::MainMenu as main_menu_ui
# Runs once, when the scene starts: put the menu on screen.fn _ready() void {  # show() returns the menu; we don't need it, and `_ =` says so.  _ = UiManager.show(main_menu_ui)}
Last, in Project Settings, application/run/main_scene is now res://scenes/main_menu.scene:
the game starts on the menu.
5. The Controls screen
Section titled “5. The Controls screen”Create ui/Controls.uip. The root is a Control called Controls, full screen:
Dim(ColorRect), full screen, black at half opacity: it darkens what is behind.Center(CenterContainer), full screen.Panel(PanelContainer): the window, styled bybase.gss.Column(VBoxContainer), Separation 8:Title(Label), ClassTitle, textControls.- Three rows,
MoveLeftRow,MoveRightRowandJumpRow(HBoxContainer, Separation 12), each with a Label (MoveLeftLabel, Custom Minimum Size 110 × 0, the textMove left) and a Button (MoveLeftKey, 90 × 0). The same forMoveRightandJump. Hint(Label), ClassHint.Buttons(HBoxContainer, Alignment Center):ResetandBack(Button).
The Controls screen also opens from the pause menu, while the game is paused. When it is, only
what has its process mode set to Always works. Select the root and set Process > Mode to
Always. The Inspector hides the Process group: write process in Filter Properties, or
turn on Show Advanced Properties in its ⋮ menu.
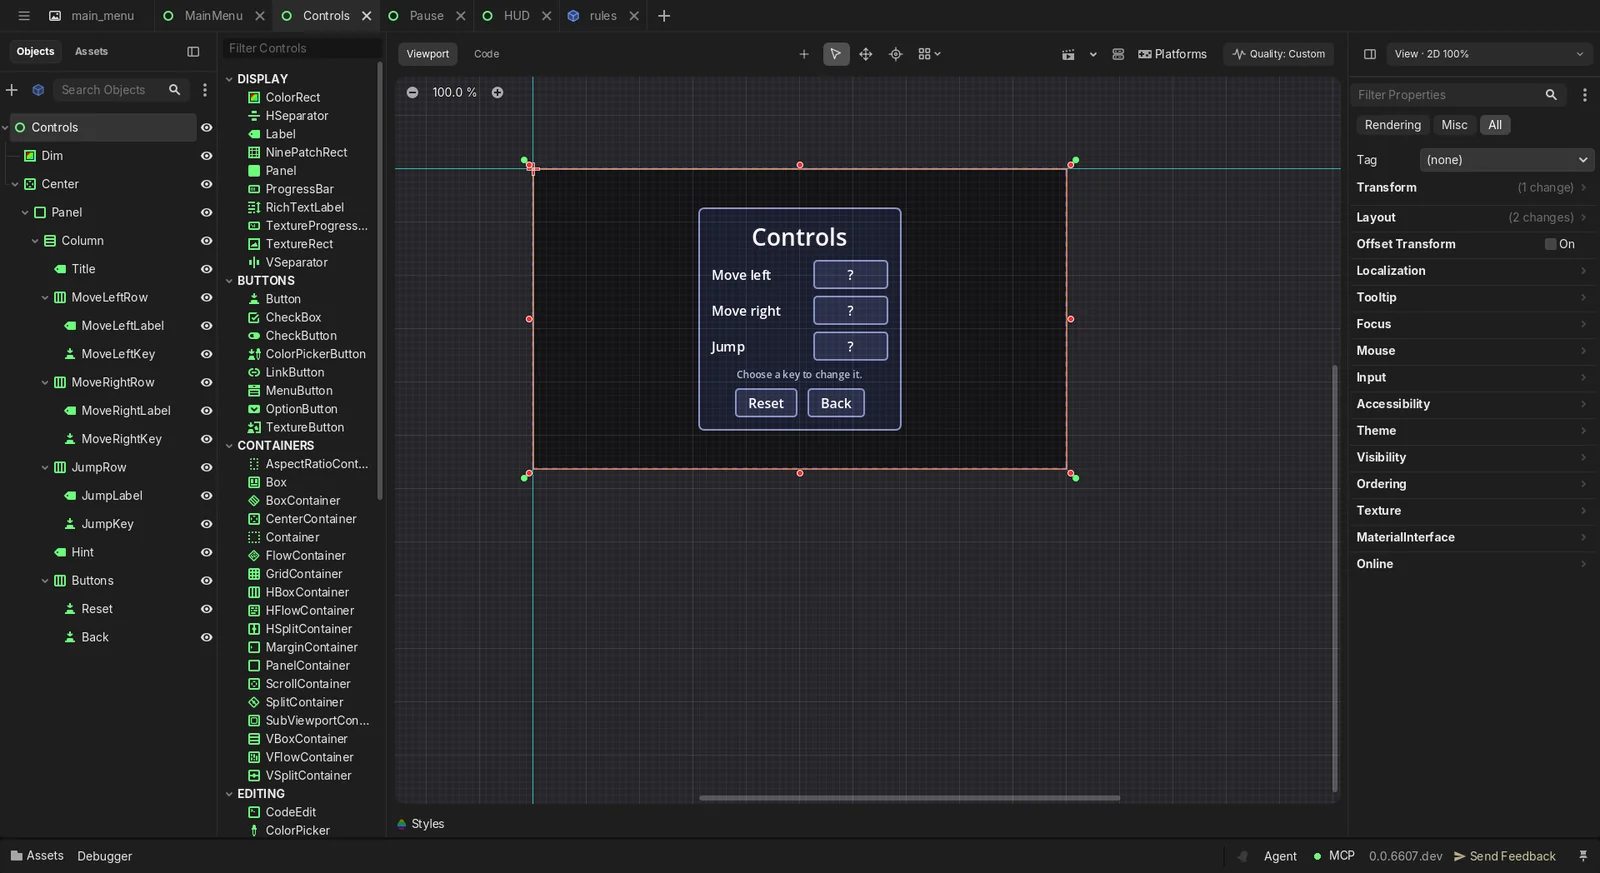
Its code:
module Controls
# The screen where the player changes the keys. It lists the keys# marked "Player Mappable" in input/controls.inputcontext.use actor::MoveLeftKey as move_left_key : Buttonuse actor::MoveRightKey as move_right_key : Buttonuse actor::JumpKey as jump_key : Buttonuse actor::Hint as hint : Labeluse actor::Reset as reset_button : Buttonuse actor::Back as back_button : Buttonuse input::controls as controls
HINT :: String = "Choose a key to change it."
# The key that waits for a new one (its mapping name), or "" if none.mut waiting := ""# The button that opened this screen: it gets the focus back after.mut opener : Control = null
# Runs once, when the screen appears.fn _ready() void {  opener = get_viewport().gui_get_focus_owner()  # Enhanced Input lists the keys of the contexts that are on. In the  # main menu nobody has turned "controls" on yet.  controls.enable(0)  show_keys()  move_left_key.grab_focus()}
# Each button shows the key its action uses now.fn show_keys() void {  move_left_key.text = key_text("move_left")  move_right_key.text = key_text("move_right")  jump_key.text = key_text("jump")  hint.text = HINT}
# The key `mapping` uses now ("A", "Space"...): the player's own, or# the one the context comes with.fn key_text(mapping: String) String {  for entry in EnhancedInput.get_player_mappable_keys() {    # Each entry is a Dictionary: mapping_name, display_name,    # key_text...    key : Dictionary = (entry as Dictionary) ?? {}    if key.get("mapping_name", "") == mapping {      return str(key.get("key_text", ""))    }  }  return "?"}
on move_left_key.pressed() {  wait_for_key("move_left", move_left_key)}
on move_right_key.pressed() {  wait_for_key("move_right", move_right_key)}
on jump_key.pressed() {  wait_for_key("jump", jump_key)}
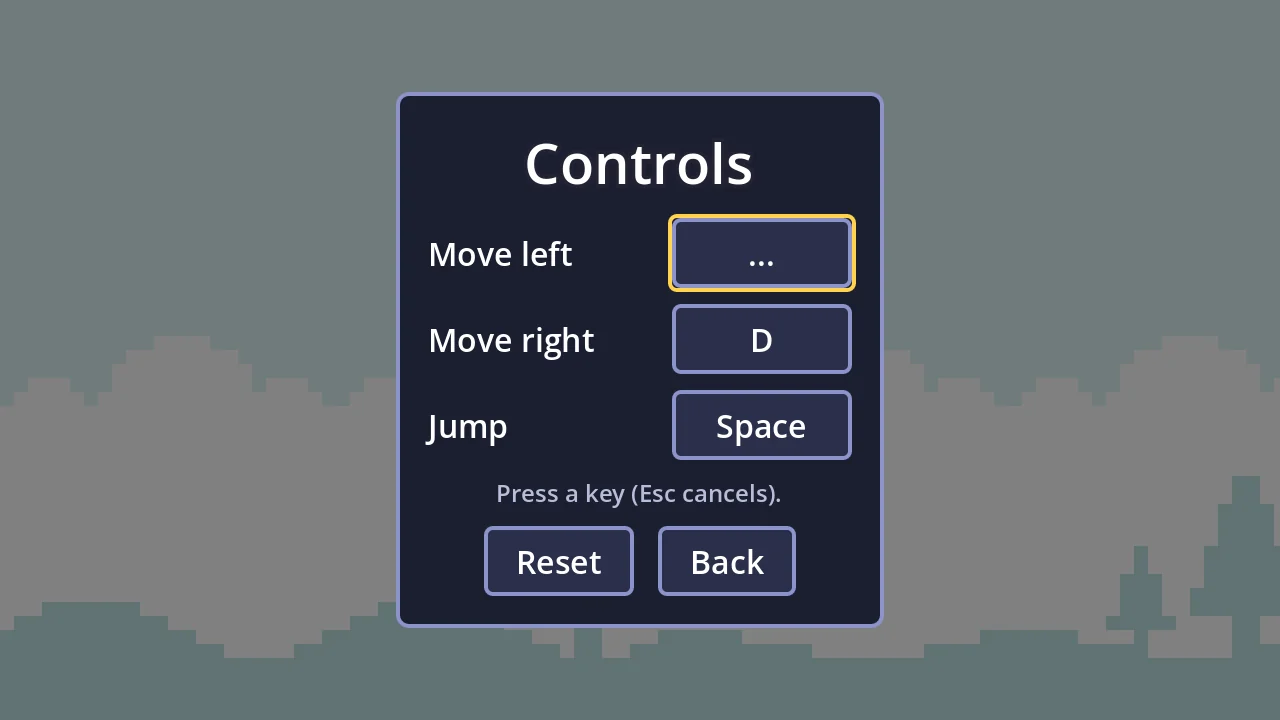
# The next key the player presses goes to `mapping`.fn wait_for_key(mapping: String, button: Button) void {  waiting = mapping  button.text = "..."  hint.text = "Press a key (Esc cancels)."}
# Every key press comes here first, before the buttons see it.fn _input(event: InputEvent) void {  key : InputEventKey = event as InputEventKey  # Only a key going down; not the mouse, not a key held down.  if key == null or not key.pressed or key.echo {    return  }  if waiting == "" {    # Esc leaves the screen, as Back does.    if key.keycode == KEY_ESCAPE {      get_viewport().set_input_as_handled()      close()    }    return  }  # This key is the answer: the buttons don't get it.  get_viewport().set_input_as_handled()  if key.keycode != KEY_ESCAPE {    EnhancedInput.set_player_mapped_key(waiting, key)    # Saved in user://input_mappings.cfg: the next time the game    # starts, Enhanced Input loads it by itself.    _ = EnhancedInput.save_player_mapped_keys()  }  waiting = ""  show_keys()}
# Back to the keys the context comes with.on reset_button.pressed() {  EnhancedInput.reset_all_player_mapped_keys()  _ = EnhancedInput.save_player_mapped_keys()  show_keys()}
on back_button.pressed() {  close()}
fn close() void { if opener != null { opener.grab_focus() } UiManager.hide(self)}EnhancedInput.get_player_mappable_keys()lists the keys marked Player Mappable: for each one, itsmapping_name, itsdisplay_nameand the key it uses now, as text (key_text).- When a key button is pressed, the screen waits: the next key that goes down is the new one.
_input()gets every key before anything else.set_input_as_handled()keeps that key away from the buttons, so Enter doesn’t press another one. EnhancedInput.set_player_mapped_key(name, key)changes the key, and the game uses it at once.save_player_mapped_keys()writes it touser://input_mappings.cfg. The next time the game starts, Enhanced Input loads it by itself (Project Settings,input_devices/enhanced_input/load_player_mapped_keys, on by default).reset_all_player_mapped_keys()goes back to the keys of the context.
6. The pause menu
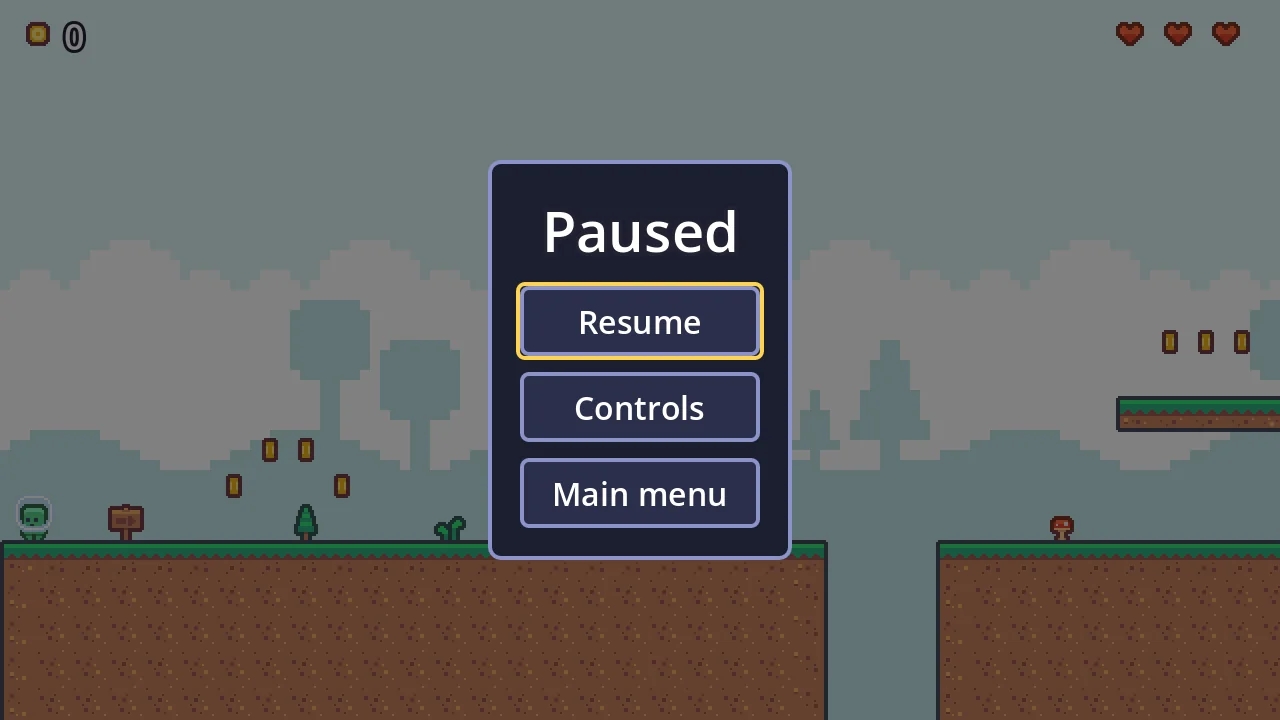
Section titled “6. The pause menu”Create ui/Pause.uip, like the Controls screen: a root Pause (full screen, Process >
Mode: Always), a Dim, a Center with a Panel, and in its Column a Title (Paused)
and three buttons: Resume, Controls and Menu (with the text Main menu).
module Pause
# The pause menu. The HUD shows it when Esc is pressed and pauses the# game. Its root's Process > Mode is Always: it works while the rest of# the game waits.use actor::Resume as resume_button : Buttonuse actor::Controls as controls_button : Buttonuse actor::Menu as menu_button : Buttonuse ui::Controls as controls_uiuse interface::game as game
fn _ready() void {  resume_button.grab_focus()}
on resume_button.pressed() {  resume()}
on controls_button.pressed() {  # Layer 20: over the pause menu, which is on layer 10.  _ = UiManager.show(controls_ui, 20)}
on menu_button.pressed() {  get_tree().paused = false  game.reset() # coins, hearts and `won` back to how they started  SceneManager.load("main_menu")}
# Esc goes back to the game, as Resume does. While the Controls screen# is open, it gets Esc first.fn _unhandled_input(event: InputEvent) void {  if event.is_action_pressed("ui_cancel") {    get_viewport().set_input_as_handled()    resume()  }}
fn resume() void { get_tree().paused = false UiManager.hide(self)}get_tree().pausedstops the whole game: the physics, the enemies, the timers and the actions of Enhanced Input. Only what is Always keeps going, like this menu.UiManager.hide(self)takes the menu off the screen.
The HUD is on screen the whole level, so it is the one that opens the pause menu. Add to
ui/HUD.uip’s code the use ui::Pause and the function at the end:
module HUD
use actor::Coins as coins_label : Labeluse actor::Heart1 as heart1 : TextureRectuse actor::Heart2 as heart2 : TextureRectuse actor::Heart3 as heart3 : TextureRectuse actor::Message as message : Labeluse interface::game as gameuse ui::Pause as pause_ui
# A heart you have keeps its colours; a lost one is dark.FULL :: Color = Color(1, 1, 1, 1)EMPTY :: Color = Color(0.2, 0.2, 0.3, 0.6)
# @onready watch: runs at the start and every time the coins change.@onready watch game.coins(value: int) {  coins_label.text = str(value)}
@onready watch game.hearts(value: int) {  # `a if condition else b`: a if the condition holds, else b.  heart1.modulate = FULL if value >= 1 else EMPTY  heart2.modulate = FULL if value >= 2 else EMPTY  heart3.modulate = FULL if value >= 3 else EMPTY
  if value == 0 {    message.text = "Try again!"  }}
watch game.won(value: bool) {  if value {    message.text = "Level complete!"  }}
# Esc during the match pauses the game and shows the pause menu.fn _unhandled_input(event: InputEvent) void {  # Only while the match goes on: not after the flag or a loss.  playing : bool = GameMode.get_match_state() == GameMode.MATCH_IN_PROGRESS  if event.is_action_pressed("ui_cancel") and playing {    get_viewport().set_input_as_handled()    get_tree().paused = true # everything stops, except what is Always    _ = UiManager.show(pause_ui, 10)  }}
ui_cancel is the engine’s action for Esc, the one menus use to go back.
7. Back to the menu after the flag
Section titled “7. Back to the menu after the flag”With a main menu, the game shouldn’t stay on “Level complete!”. In the rules
(prefabs/rules.prefab), after the win, wait two seconds and go to the menu:
module Rules
# The rules of the match. The Game Mode creates this prefab in every# level (Project Settings > Application > Game Mode > Rules) and it# decides when the match ends and what happens then.use interface::game as gameuse audio::win as win_snd
# The flag was reached: the match ends with a win, and the game goes# back to the main menu.watch game.won(value: bool) {  if value {    AudioManager.play_sound(win_snd)    GameMode.end_match()    spawn back_to_menu()  }}
# No hearts left: the match ends and the level starts again.watch game.hearts(value: int) {  if value == 0 {    GameMode.end_match()    spawn restart()  }}
async fn restart() void {  await sleep(1.5) # time to read "Try again!"  game.reset() # coins, hearts and `won` back to how they started  # Load the level again: the Game Mode starts a new match there.  SceneManager.restart()}
async fn back_to_menu() void {  await sleep(2.0) # time to read "Level complete!"  game.reset()  SceneManager.load("main_menu")}
8. Try it
Section titled “8. Try it”Press Play (F5). The game starts on the menu:
- With the arrows, go to Controls and press Enter. Press the button of Move left and then J: J moves left now, and A doesn’t.
- Back, and Play. In the level, Esc pauses: nothing moves. Controls opens over the pause menu, and Reset gives back the keys the game came with.
- Close the game and open it again: the keys you chose are still there.
On Windows the file is in %APPDATA%\Gobu\app_userdata\Pixel Platformer\input_mappings.cfg.
Delete it to start again with the context’s keys. In a web game, the browser keeps it.
What you used
Section titled “What you used”| In the code | Where it is explained |
|---|---|
use ui::, UiManager.show() / hide() | Importing with use, User interfaces |
on button.pressed(), grab_focus() | Signals, User interfaces |
| A scene’s Game Mode (Override) | Game flow |
Player Mappable, EnhancedInput.set_player_mapped_key() | Input, Input |
fn _input(), fn _unhandled_input() | Input |
for entry in ..., as Dictionary, ?? | Control flow, Expressions |
spawn, await sleep() | Concurrency |